You’ve decided you need a professional headshot. Maybe your LinkedIn profile still has that cropped vacation photo from 2019. Maybe HR just sent the third reminder about updating the team page. Maybe you Googled yourself and winced.
Last updated: March 15, 2026 · Written by Brian Confer, Co-founder & COO at Capturely
So you’re thinking: how hard can it be? Grab my phone, find some decent light, smile, done. Right?
Sometimes, yes. But here’s the honest answer most “how to take professional headshots” guides won’t tell you: the camera isn’t the hard part. Knowing what to do with your face, your shoulders, and that weird tension in your jaw that you can’t see but the camera definitely can — that’s the hard part. And if you’re one of the 87% of people who don’t consider themselves photogenic, doing it alone makes everything harder.
This guide covers both paths. First, real DIY tips that actually work — lighting, posing, expression, wardrobe, editing — so you can get a decent headshot on your own. Then, the option most guides skip entirely: what happens when a professional photographer directs you through the shoot in real time, from your phone, in about 10 minutes. Companies like Google, Netflix, and McKinsey use that second approach through Capturely’s virtual sessions — and there’s a reason the satisfaction rate sits at 98%.
Pick what fits your situation. But at least know what all your options are.
Why Your Professional Headshot Actually Matters (The Data)
Before spending 10 minutes or 10 hours on this, you should know what’s at stake.
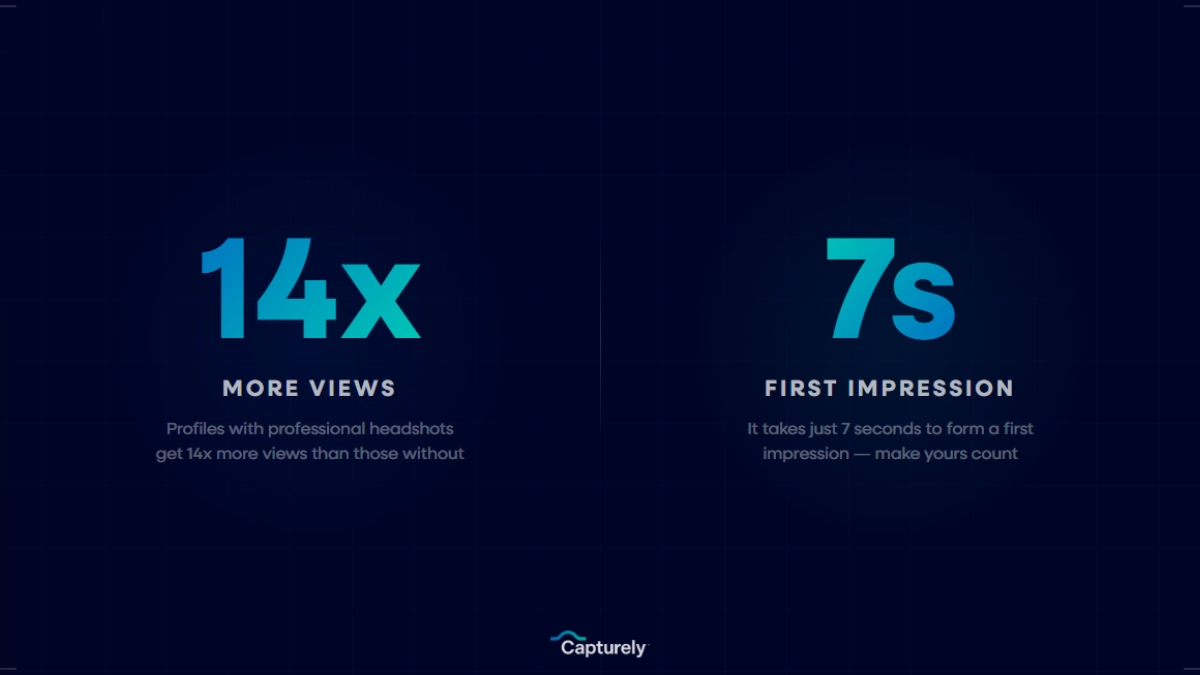
LinkedIn’s own research shows profiles with professional headshots receive 14x more profile views and 36x more messages than profiles without one. That’s not a rounding error. That’s the difference between being found and being invisible.
Princeton researcher Janine Willis demonstrated that people form trustworthiness judgments from a face in 100 milliseconds — one-tenth of a second. Your headshot gets less time than a blink to make its impression. And 94% of that first impression is design-related, meaning the quality of your photo matters more than you think.
It goes beyond LinkedIn. Eighty percent of clients and partners research your team online before meetings. Your headshot appears on the company website, email signature, Slack profile, conference badges, proposals, and directory listings. One photo, seven or more touchpoints. A bad one — blurry, outdated, poorly lit, obviously a selfie — chips away at credibility each time.
Here’s the number that should make you take this seriously: 65% of recruiters and hiring managers say a candidate’s headshot significantly influences their perception before the first conversation even happens. Whether that’s fair is debatable. Whether it’s real is not.
How to Take Professional Headshots at Home: Step by Step
If you’re going the DIY route, these steps will get you the best result possible. Follow them in order — each one builds on the last.
Step 1: Set Up Your Lighting (This Is 60% of the Photo)
Lighting makes or breaks a headshot. Not the camera. Not the pose. Not the outfit. Lighting.
The window technique: Stand facing a large window with natural light coming in. Not direct sunlight — that creates harsh shadows and makes you squint. Overcast days are actually ideal. The light should be soft, even, and hitting your face from slightly to one side (about 45 degrees) for gentle dimension.
Kill the overhead lights. Turn off every artificial light in the room. Mixed light sources (warm overhead bulbs plus cool window light) create unflattering color casts that are nearly impossible to fix in editing. Stick to one light source.
The paper test: Hold a white piece of paper next to your face while looking at the camera screen. If the paper looks yellow or orange, your lighting is too warm. If it looks blue, it’s too cool. If it looks white, you’re good.
Time of day matters. Late morning or early afternoon gives you the most consistent natural light. Avoid late afternoon (too warm and directional) and anything after sunset (not enough light means grainy photos).
What to avoid: Standing directly under a ceiling light (creates “raccoon eyes” with dark shadows in your eye sockets), backlighting from a window behind you (turns you into a silhouette), and ring lights unless you know how to position them properly (the circular catchlight in your eyes screams “influencer,” not “professional”).
Step 2: Choose Your Background
The best headshot backgrounds are ones nobody notices. They frame your face without competing for attention.
Solid walls work. A white, light gray, or muted blue wall is fine. Make sure it’s clean — no light switches, picture hooks, or textured wallpaper showing.
Distance from the wall. Stand at least 3-4 feet away from the background. This creates natural depth separation (a slight blur behind you) and prevents your shadow from appearing in the shot.
What to avoid: Cluttered backgrounds (bookshelves, kitchen counters, bathroom mirrors), anything with strong patterns, other people in the frame, and the classic mistake — a background that’s brighter than your face, which makes the camera expose for the background and turn you dark.
If you want to see what different background options look like with actual headshots, we put together a full visual guide: 15 professional headshot backgrounds and how to choose.
Step 3: Get Your Camera Right
You don’t need a DSLR. Your phone is probably fine — with some specific settings.
Use the rear camera. Always. The front-facing selfie camera has a wider lens that distorts facial proportions (makes your nose look bigger, your face rounder). The rear camera on most modern phones captures 36-48 megapixels with a more natural focal length. That’s more resolution than most professional cameras had 10 years ago.
Set your phone at eye level. Prop it on a stack of books, use a cheap tripod, or have someone hold it. Below eye level = unflattering upward angle. Above eye level = you look like you’re taking a dating app photo. Eye level = professional.
Use the self-timer. Set a 3-second or 10-second delay so you’re not lunging for the shutter button. If your phone has a burst mode option, use it — take 20-30 shots per setup and pick the best ones later.
Turn on portrait mode if your phone has it. This blurs the background slightly (“bokeh” effect) and keeps your face sharp, mimicking the look of a professional lens.
Keep it at 1x zoom. Some guides recommend 2x zoom for a more flattering compression, and that can work on newer phones. But digital zoom degrades quality. If your phone has a dedicated 2x telephoto lens (iPhone Pro, Samsung Galaxy S series), use it. If not, stick with 1x and step back instead.
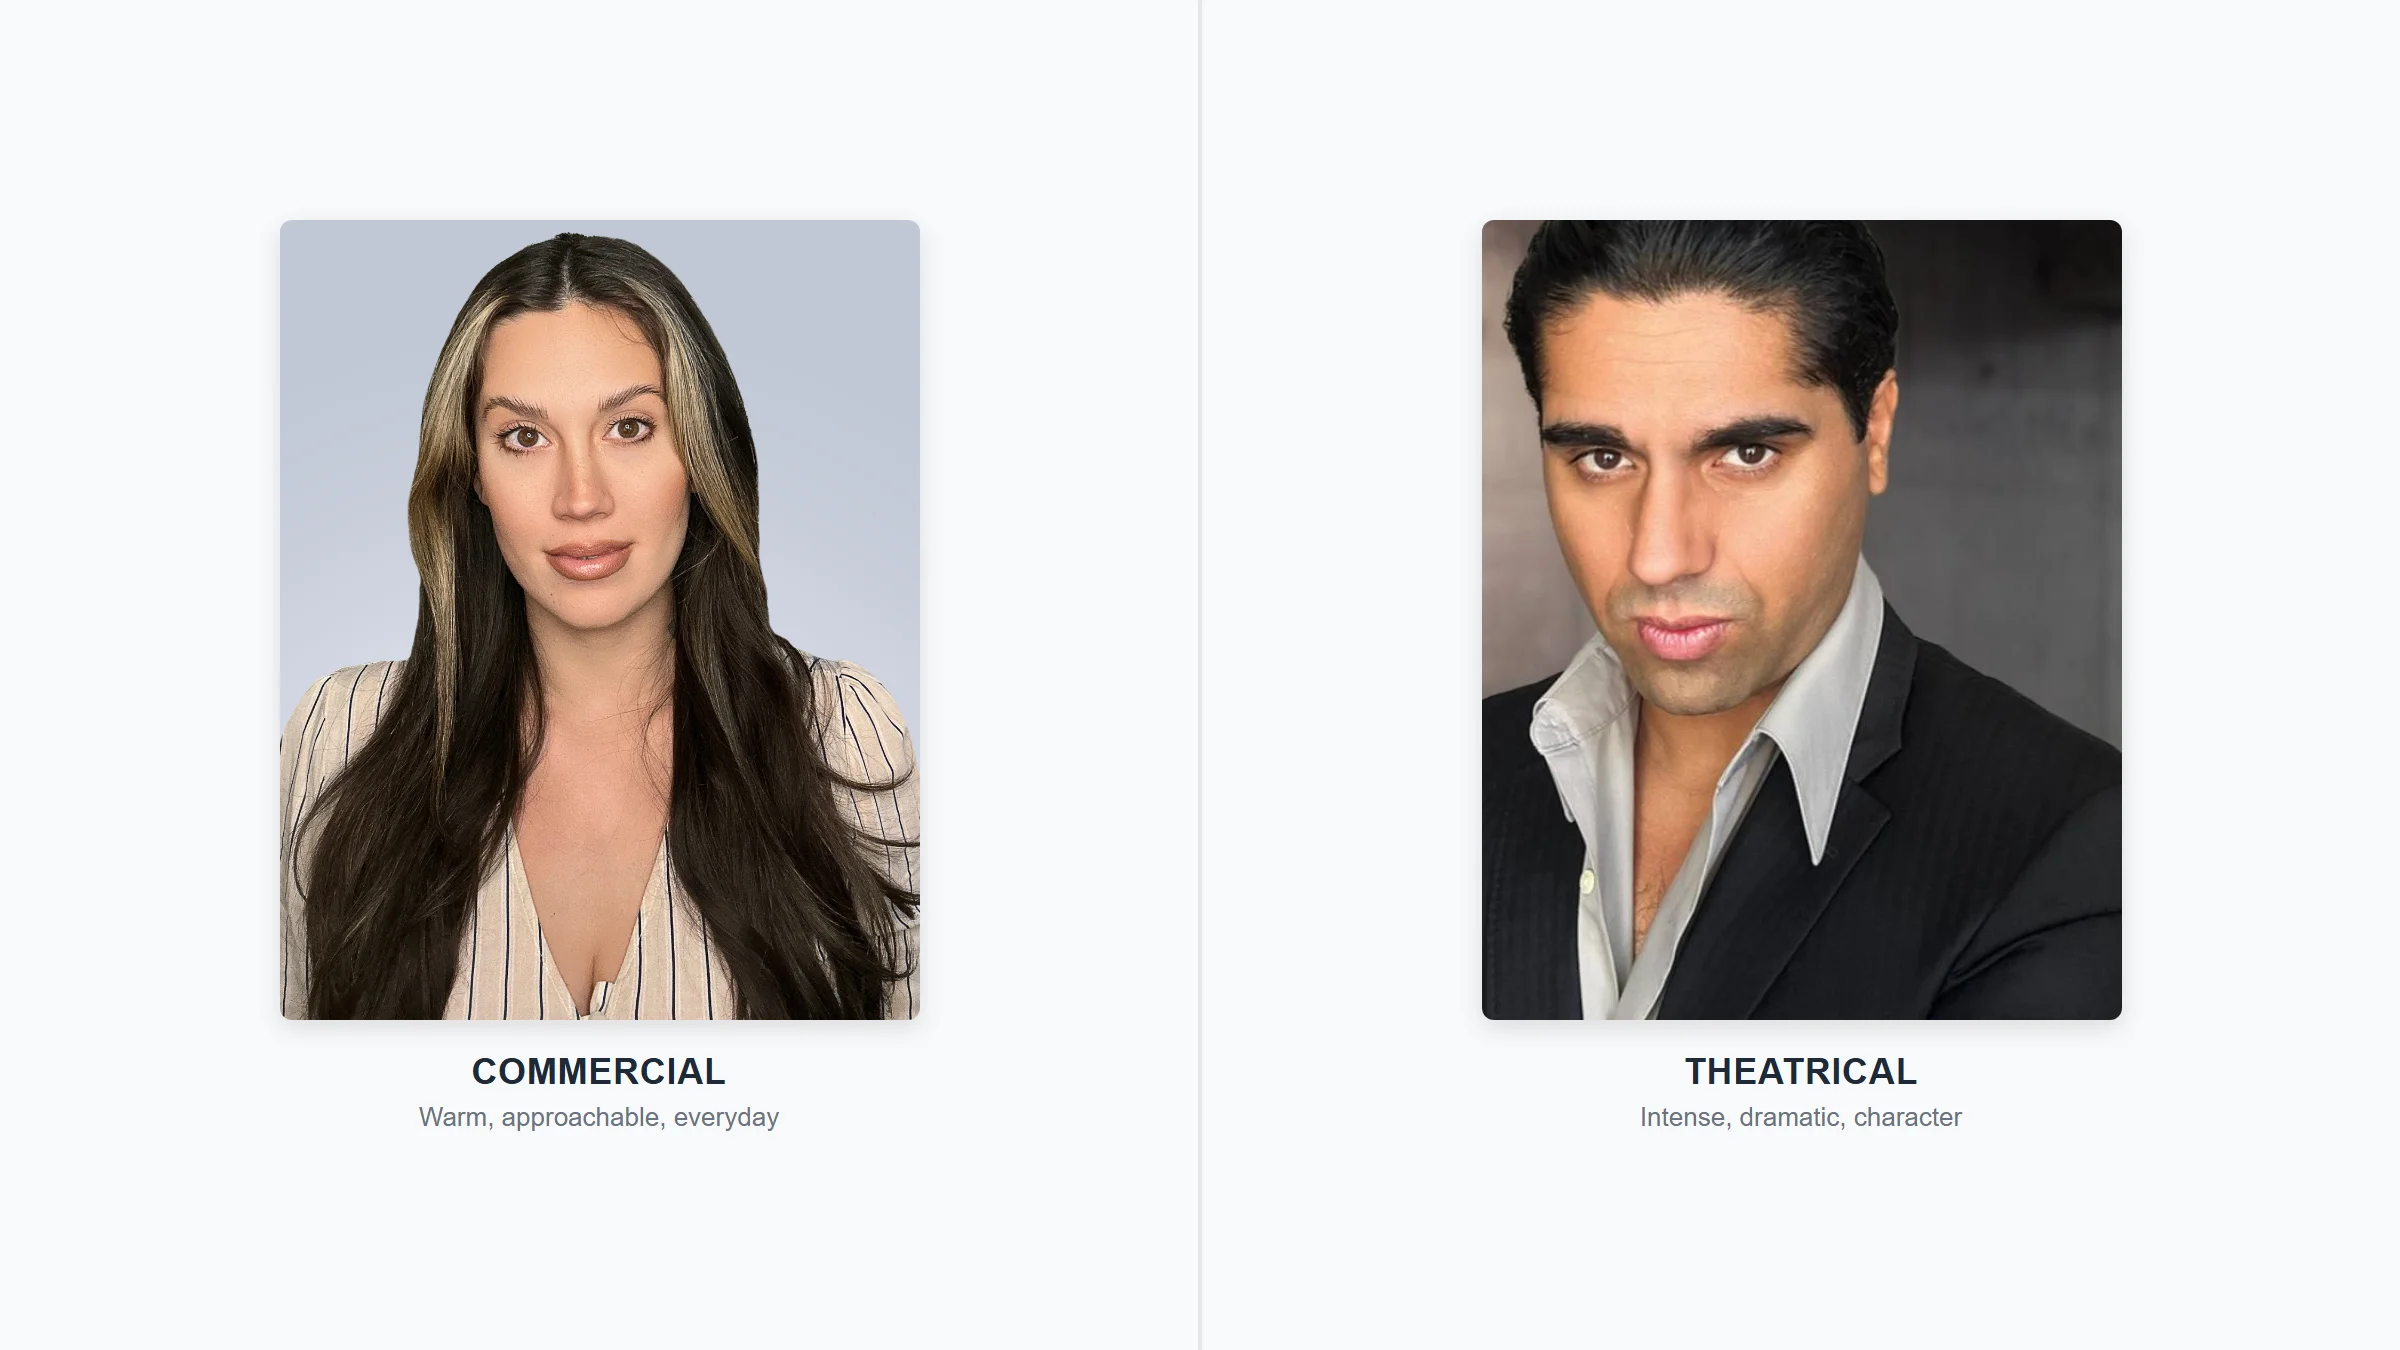
Step 4: Dress for Your Industry
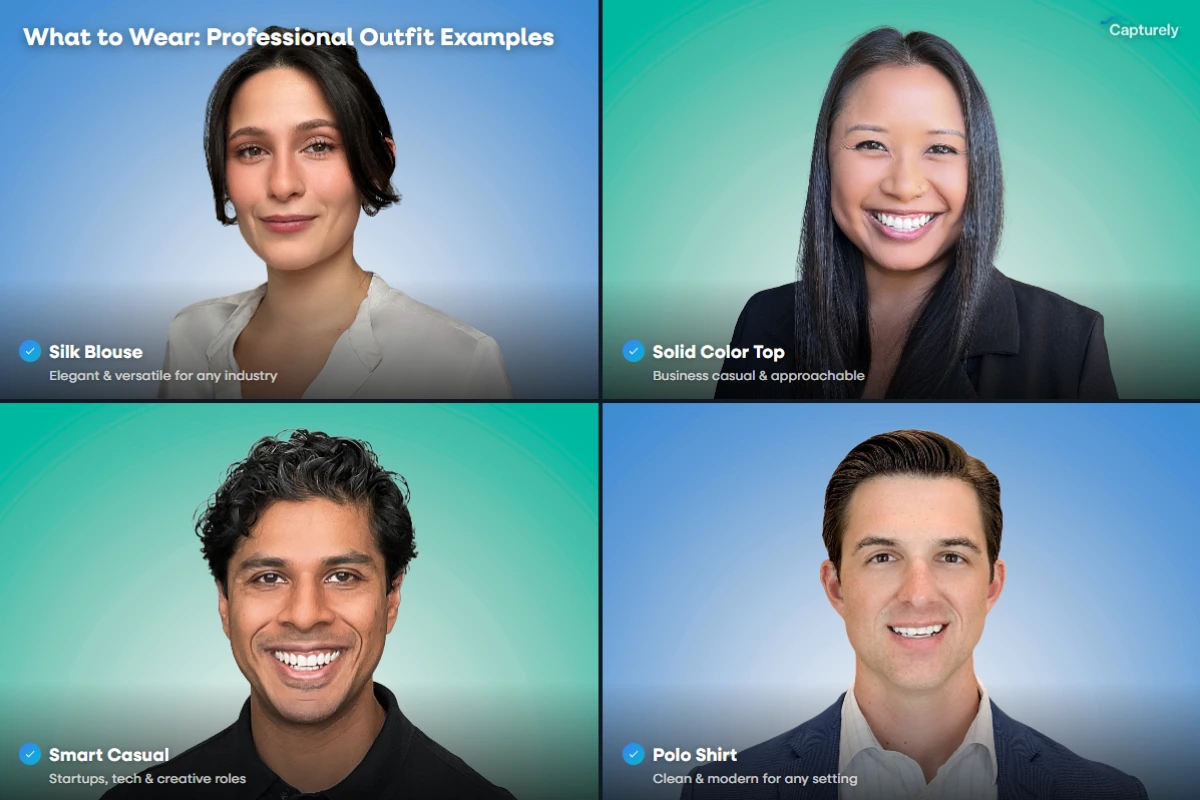
Your outfit should match the professional context where this headshot will appear. That’s industry-dependent.
Corporate / Finance / Law: Structured blazer over a collared shirt or blouse. Dark, solid colors (navy, charcoal, black). Conservative jewelry. The goal is authority and trustworthiness.
Tech / Startup: Smart casual. A clean button-down without a tie, or a quality crew neck. No hoodie unless you’re deliberately going for a Mark Zuckerberg vibe — and even he upgraded.
Healthcare: This one’s a toss-up. Some providers prefer their white coat (instant credibility signal). Others prefer professional business attire. Check what your organization’s directory looks like and match it.
Creative / Media: You have more latitude. A leather jacket, an interesting neckline, a bold color — something that signals personality. But keep it clean and well-fitting.
Real Estate: Professional but approachable. Bright, solid colors photograph well and stand out in listing directories. Avoid patterns that compete with the agent’s face.
Universal rules: Solid colors photograph better than patterns (stripes and small patterns create a moiré effect on camera). Avoid bright white (it reflects too much light and distracts from your face). Iron your clothes — wrinkles show up worse on camera than in person. And make sure the neckline sits properly — a crooked collar will bother you forever once you notice it.
For a deeper dive with photo examples by industry, see our full wardrobe guide: what to wear for professional headshots.
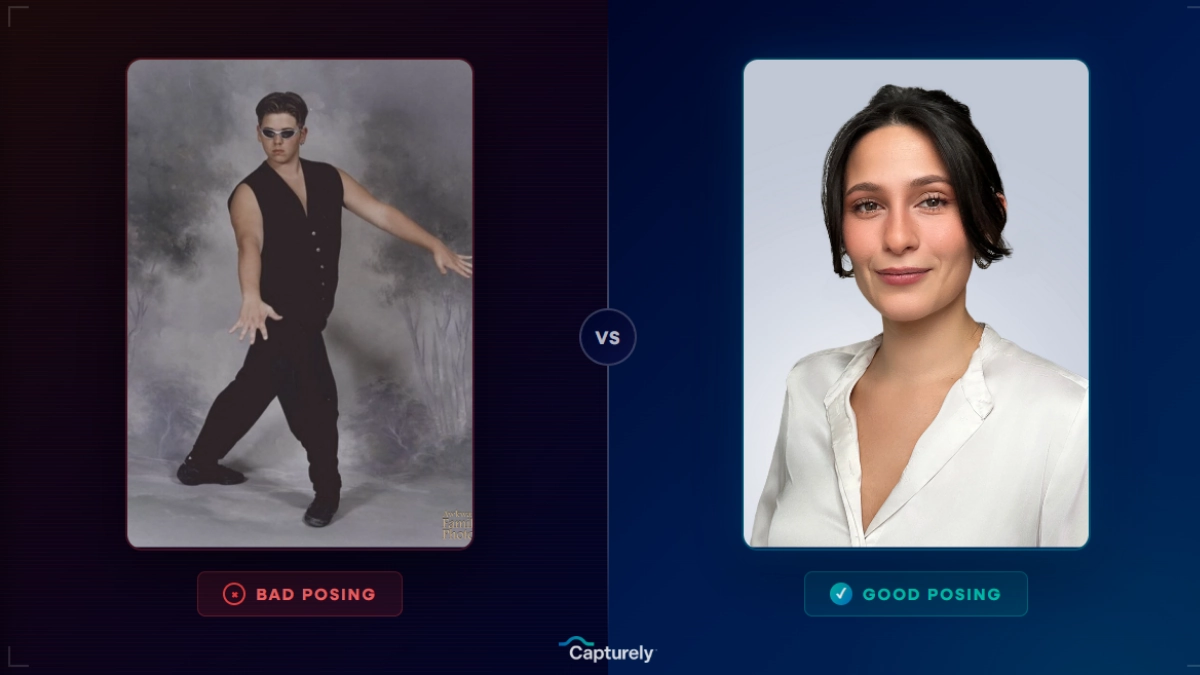
Step 5: Master Your Posing
This is where most DIY headshots fall apart. You know what you want to look like. You cannot see what you actually look like while the photo is being taken. That gap is the whole problem.
Here’s what works:
The chin push. Push your chin slightly forward and down. Not up (makes you look haughty). Not tucked into your chest (creates a double chin). Forward and slightly down — it defines your jawline and eliminates that soft under-chin area that cameras love to find.
Angle your body. Don’t face the camera dead-on — it makes your shoulders look wider and your body look flat. Turn your torso about 30-45 degrees to one side, then turn your head back toward the camera. This creates depth and makes you look more naturally dimensional.
Drop your shoulders. Right now, reading this, your shoulders are probably slightly elevated from tension. In front of a camera, they’ll be even higher. Consciously pull them down and back before every shot. Tense shoulders make you look uncomfortable because you are.
The lean. Lean very slightly forward toward the camera — just barely. This conveys engagement and confidence. Leaning back (even by a degree or two) reads as disinterested or uncertain.
Where to look. Look directly into the lens. Not at yourself on the screen. Not at the phone’s edge. Into the actual camera lens. This creates the “eye contact” effect in the final photo. It feels weird. It works.
Hands. If you’re doing a headshot (face and shoulders only), hands shouldn’t be visible. If you’re doing a wider framing (waist up), crossing your arms can work if it’s relaxed, not defensive. One hand in a pocket works too. Avoid hands clasped in front of you — it reads as nervous.

Step 6: Get Your Expression Right
The hardest part. Nobody can “act natural” on command. But there are techniques that work:
The memory trick. Right before the photo, think of something genuinely funny that happened recently. Not “smile” — actually recall a specific moment. The difference between a performed smile and a recalled smile is visible in milliseconds. A real smile (called a Duchenne smile, named after the French neurologist who identified it) engages the muscles around your eyes. A fake one doesn’t. Viewers can tell, even if they can’t articulate why.
The exhale technique. Take a deep breath. Let it out slowly. At the bottom of the exhale, your face naturally relaxes. Click. This eliminates the held-breath tension that shows up as a clenched jaw, stiff lips, and wide eyes.
The “squinch.” Photographer Peter Hurley coined this term (he’s spoken at Google, Apple, and TEDx about headshot technique). Instead of smiling wider, narrow your lower eyelids very slightly — like you’re about to smile with just your eyes. It conveys confidence and warmth without the full grin. Look it up on YouTube. Practice in a mirror. It works remarkably well.
Mouth position: Slightly parted lips look more natural than a closed mouth (which can read as tense) or a full open-mouth smile (which can look over-eager). Find the middle ground — lips gently together or just barely separated.
Take a lot of shots. Seriously. Twenty minimum. You need quantity to find the one where everything — expression, posture, lighting, angle — aligned for a fraction of a second. Professional photographers shoot hundreds of frames per session. Give yourself the same statistical advantage.
Rather skip the guesswork? Capturely connects you with a live photographer who directs your expression, posture, and lighting in real time — from your phone, in 10 minutes. 98% satisfaction rate. Get your free instant quote →
Step 7: Edit (But Don’t Over-Edit)
Editing a headshot isn’t about making yourself look different. It’s about making the photo look like what your eyes saw in person — which cameras don’t always capture accurately.
Exposure and brightness: Bring up the exposure if your face looks too dark. Reduce highlights if parts of your forehead or cheeks are blown out (bright white patches).
White balance: Correct any color cast. Your skin should look natural, not yellow from tungsten lights or blue from shade. Most editing apps have an “auto” white balance that gets you 80% of the way there.
Crop: Frame the shot from mid-chest up. Center your eyes in the upper third of the frame (the rule of thirds still applies). Leave some space above your head — not too much, not none.
Light retouching: Smooth out temporary blemishes (a pimple, a stray hair across your face). Don’t smooth out your actual skin texture — it creates the uncanny-valley “AI filter” look that undermines authenticity. You want to look like yourself on a good day, not like a CGI character.
Apps that work: Lightroom Mobile (free, powerful), Snapseed (free, Google-owned), or Facetune (paid, be careful — it’s easy to overdo it). Avoid heavy beauty filters. If your headshot looks noticeably different from what people see on a Zoom call, it’s doing more harm than good.
Dimensions for your platforms:
- LinkedIn: 400×400 px minimum (displays in a circle)
- Company website: varies, but 800×800 or 500×500 is common
- Email signature: 200×200 to 300×300 px
- Slack/Teams: 512×512 px
- Zoom: 640×640 px
Export at the highest resolution your app allows. You can always downsize later; you can’t upsize without losing quality.
The Part Nobody Talks About: Why DIY Headshots Usually Disappoint
Here’s a stat that explains everything: 87% of people don’t think they’re photogenic.
Read that again. Nearly nine out of ten adults walk into a photo situation already convinced they’re going to look bad. And here’s the problem with DIY: when you’re the photographer AND the subject, you’re managing both the technical setup and your own anxiety at the same time. You’re adjusting the lighting while also trying to relax your face. You’re checking the framing while also dropping your shoulders. You’re setting the timer, rushing into position, forcing a smile, and hoping for the best.

Research backs this up. 56% of people specifically worry about not knowing how to pose, and 43% report feeling nervous before any photography session — even when someone else is behind the camera. Now remove that someone else entirely and ask the nervous person to direct themselves. You can see why corporate photo day no-show rates hit 15-20%.
Photofeeler’s research found something even more telling: people are consistently bad at choosing their own best photos. We pick the images where we think we look good, but those aren’t always the ones that score highest for competence, likability, and influence with other people. There’s a disconnect between how we see ourselves and how others perceive us — and no amount of mirror practice fully bridges it.
This doesn’t mean DIY is impossible. The tips above genuinely work. But they have a ceiling. And that ceiling is the fact that you can’t see your own face while the photo is being taken.
The Direction Gap: What a Professional Photographer Actually Does
The difference between a DIY headshot and a professionally directed one isn’t the camera. It’s the direction.
A professional photographer sees things you literally cannot see about yourself in real time:
- That your jaw is clenched (you feel fine, but it’s visible)
- That a shadow just fell across your left eye (you didn’t notice the cloud)
- That your smile is showing tension in your forehead (you’re trying too hard)
- That your shoulders crept up again (they do it every 30 seconds under stress)
- That turning your head two degrees to the right catches the light better
These micro-adjustments — each one taking less than a second to coach — are the difference between an OK photo and a headshot that makes people trust you before they’ve read a word you’ve written.

The traditional way to get this direction was to book a studio photographer. That works — but it runs $150-$450 per person, requires travel, and is logistically painful for distributed teams. “The cost and the time and the scheduling just threw us,” as one corporate buyer put it. If you have people in four cities, you’re booking four photographers and hoping for four consistent results. You won’t get them.
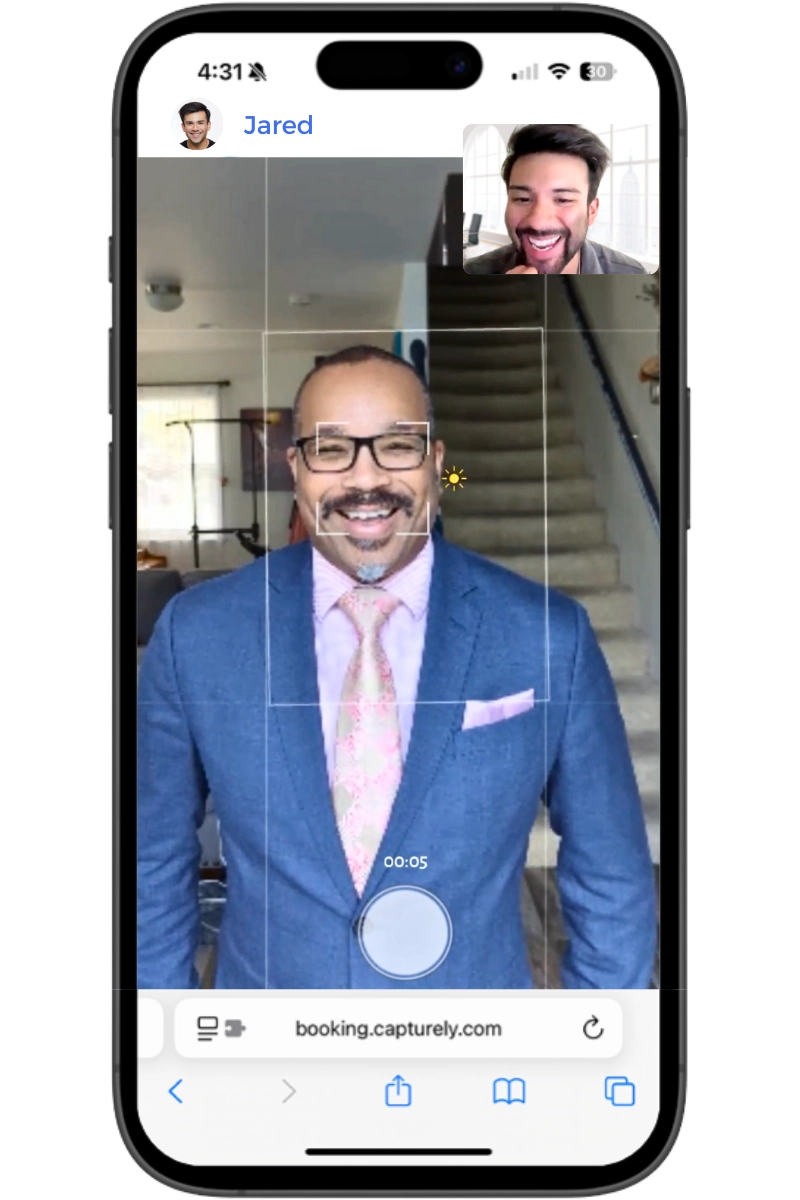
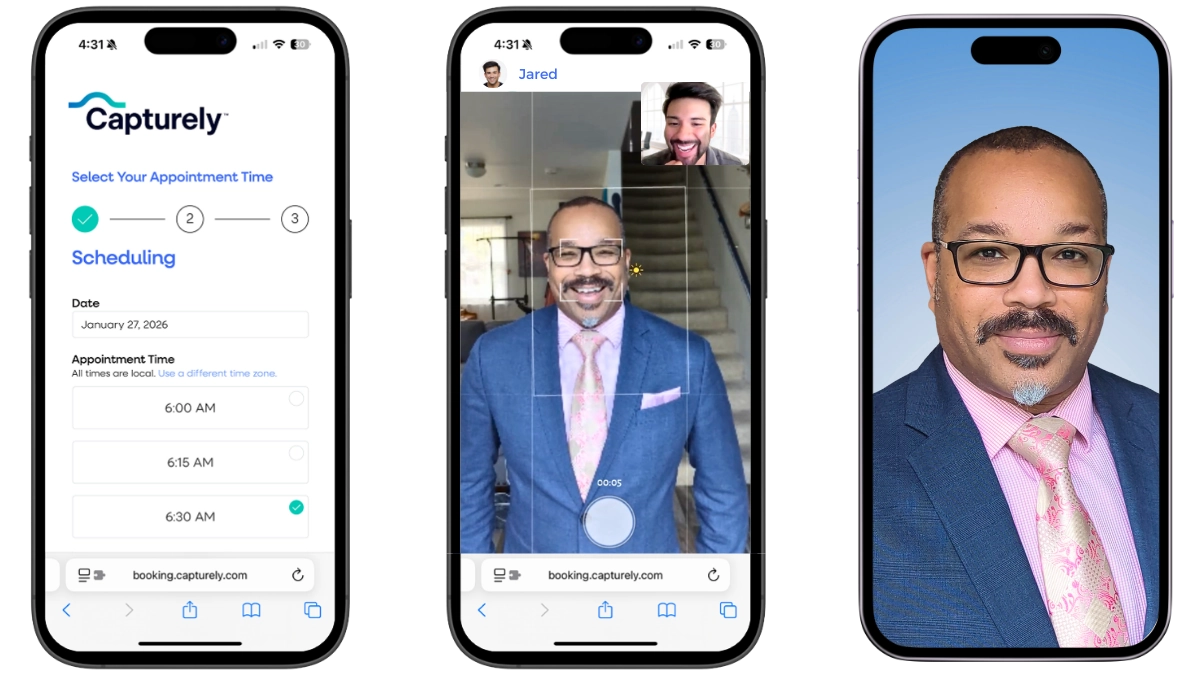
The virtual headshot model fixes this. At Capturely, a live professional photographer connects with you through your phone — like a FaceTime call. They switch you to the rear camera (the good one, 36-48 megapixels), then spend about 10 minutes directing everything: posture, expression, head angle, chin position, shoulder tension. They tell you when to breathe. They crack a joke to get a real smile. They catch the things you’d miss doing it alone.
The result: studio-quality headshots, taken from your kitchen or home office, delivered within 24 hours with professional retouching. No app download required. No travel. No awkward studio waiting room. That’s how companies like Amazon, UnitedHealth Group, Capital One, and Paramount get consistent headshots for distributed teams without the coordination nightmare.
DIY vs. Virtual vs. Studio: Which Option Fits You?
There’s no single right answer. But there is a right answer for your specific situation. Here’s how to think about it:
| Factor | DIY (Free) | Virtual + Live Photographer | In-Person Studio |
|---|---|---|---|
| Cost | $0 (your time) | $45–$79/person | $150–$450+/person |
| Direction | None — self-directed | Live professional photographer | In-person professional |
| Quality ceiling | Decent (with effort) | Studio-grade | Studio-grade |
| Time investment | 30-60 min + editing | 10 minutes | 30-60 min + travel |
| Delivery | Immediate (raw) | 24 hours (retouched) | 1-3 weeks (retouched) |
| Camera-shy friendly | You’re on your own | Photographer coaches you through it | Depends on the photographer |
| Team consistency | Nearly impossible | Built-in (same backgrounds, style matching) | Requires same photographer |
| Best for | Quick LinkedIn update, tight budget | Teams, camera-shy people, busy professionals | Executives, actors, personal branding |
Choose DIY if: You’re comfortable in front of a camera, you have good natural light, and you just need a quick update for LinkedIn. The tips in this guide will get you there. Be honest with yourself about the result — if it looks like a selfie with better lighting, it’s not done yet.
Choose virtual with a live photographer if: You want professional quality without the studio price tag, you’re one of the 87% who freeze up behind a camera, you need it done fast (24-hour delivery), or you’re managing headshots for a team. This is the sweet spot most people don’t know exists.
Choose an in-person studio if: You’re a C-suite executive, a public speaker, or someone whose personal brand directly drives revenue. The extra investment in studio lighting, wardrobe consultation, and extended session time is worth it for that audience.
Not sure which option fits? Try it risk-free — Capturely offers free demo sessions so you can see the quality before committing. $79/session individual, teams save up to 45%. See pricing for your team →
Best Poses for Professional Headshots (With What to Avoid)
Whether you’re shooting DIY or working with a photographer, these are the poses that consistently test highest for competence, likability, and trustworthiness.
The Classic Three-Quarter Turn
Turn your body 30-45 degrees away from the camera, then rotate your head back to face the lens. This is the most universally flattering headshot pose because it creates depth, slims the torso, and shows natural body language. Almost every professional headshot you’ve ever admired uses some version of this.

The Direct Face
Straight-on to the camera, slight chin forward. This reads as confident and direct — good for leadership headshots, LinkedIn profiles, and attorney directories where authority matters. It can feel confrontational if the expression is too serious, so pair it with a genuine (not forced) smile or the “squinch” technique described earlier.
The Slight Tilt
Head tilted 5-10 degrees to one side. Research on perceived approachability shows a slight tilt signals warmth and openness. Too much tilt looks casual or confused. A hint of it — barely noticeable — softens an otherwise formal headshot. Good for healthcare providers, real estate agents, and client-facing roles where approachability matters more than authority.
What to Avoid
- Arms crossed with a death grip: Crossed arms can work, but only if they’re relaxed — forearms resting on each other, not hands gripping biceps. Tense crossed arms read as defensive and closed off.
- The head-on stare with zero expression: You’re going for “confident,” but it reads as “mugshot.”
- Looking away from the camera: Works for editorial and acting headshots. Doesn’t work for professional headshots. You want to make eye contact with anyone viewing your profile.
- Chin up: Makes you look like you’re looking down at the viewer. Literally. It’s condescending on camera even if you’re just trying to avoid a double chin. Push the chin forward and slightly down instead.
- Hand on chin: The “thinker” pose looks staged in headshots. Save it for LinkedIn article thumbnails.

How to Look Natural When You Hate Being Photographed
This section is for the 87%. The ones who see “headshot day” on the calendar and immediately start planning their sick day. The ones who, as one discovery call prospect described it, “every time I ask her to come get her photo taken, the day before or the day of she comes up with this lame excuse.”
You’re not broken. You’re normal. Here’s what actually helps:
The Warm-Up
Don’t try to nail the shot on frame one. Spend the first 2-3 minutes just getting used to the camera being there. Take some throwaway photos. Make a ridiculous face. Get the self-consciousness out of your system. Professional photographers do this with every client — they shoot the first 20 frames knowing they’ll delete them. The real session starts once you forget you’re being photographed.
Move, Don’t Freeze
Static poses create stiff photos. Between shots, roll your shoulders. Shake out your hands. Turn your head away and then back toward the camera. Small movements keep your muscles from locking and your expression from flattening into “I’m posing and I hate it.”
The Mental Redirect
Instead of thinking “I need to look professional right now” (which creates tension), redirect to something specific: a project you’re proud of. A client you helped. A colleague who makes you laugh. Your brain can’t process an emotion and maintain a stress response simultaneously. Give it something positive to process.
Breathe Through Your Mouth
Sounds weird. Works. When you breathe only through your nose, your mouth tends to press into a thin line — the closed-mouth tension look that dominates bad headshots. Slightly parting your lips to breathe creates a natural, relaxed mouth position. Try it in a mirror right now. See?
When DIY Anxiety Is the Problem
Here’s an honest moment: if you hate being photographed, doing it alone might actually make it worse. There’s nobody to tell you “that looked great.” Nobody to redirect your attention from your insecurities. Nobody to catch the moment when your face relaxes between “tries” — which is often the best frame.
This is why Capturely’s virtual sessions exist. The photographer isn’t just pointing a camera at you. They’re coaching you through the discomfort. They’ve done this thousands of times. They know that the best headshot often comes at minute seven, after you’ve stopped trying so hard. They know that saying “tell me about your weekend” gets a better smile than saying “smile.” They know that the photo you think is terrible is actually the one other people respond to best.
The whole thing takes 10 minutes. You don’t have to travel. You don’t have to walk into a studio. You open a link on your phone, and a person appears who makes the experience feel less like a photo shoot and more like a conversation. That’s not marketing copy — it’s what 765+ reviews at 4.9 stars keep saying.

Common Headshot Mistakes (and How to Fix Them)
After 100,000+ headshots delivered, Capturely’s photography team has seen every mistake. These are the ones that show up most — and most people don’t realize they’re making them.
Mistake 1: The Selfie Angle
Holding your phone at arm’s length below your chin. This angle creates nostrils, under-chin shadow, and a “I just picked up my phone” look. Fix: eye level, rear camera, with the phone propped or held by someone else.
Mistake 2: Over-Editing
Smoothing your skin until it looks like plastic. Brightening your teeth until they glow. Adding a filter that makes your eyes a different color. The people who see this headshot will also see you on Zoom. When you don’t match your own photo, trust erodes instantly. Fix: edit subtly. You on a good day — not you as a digital painting.
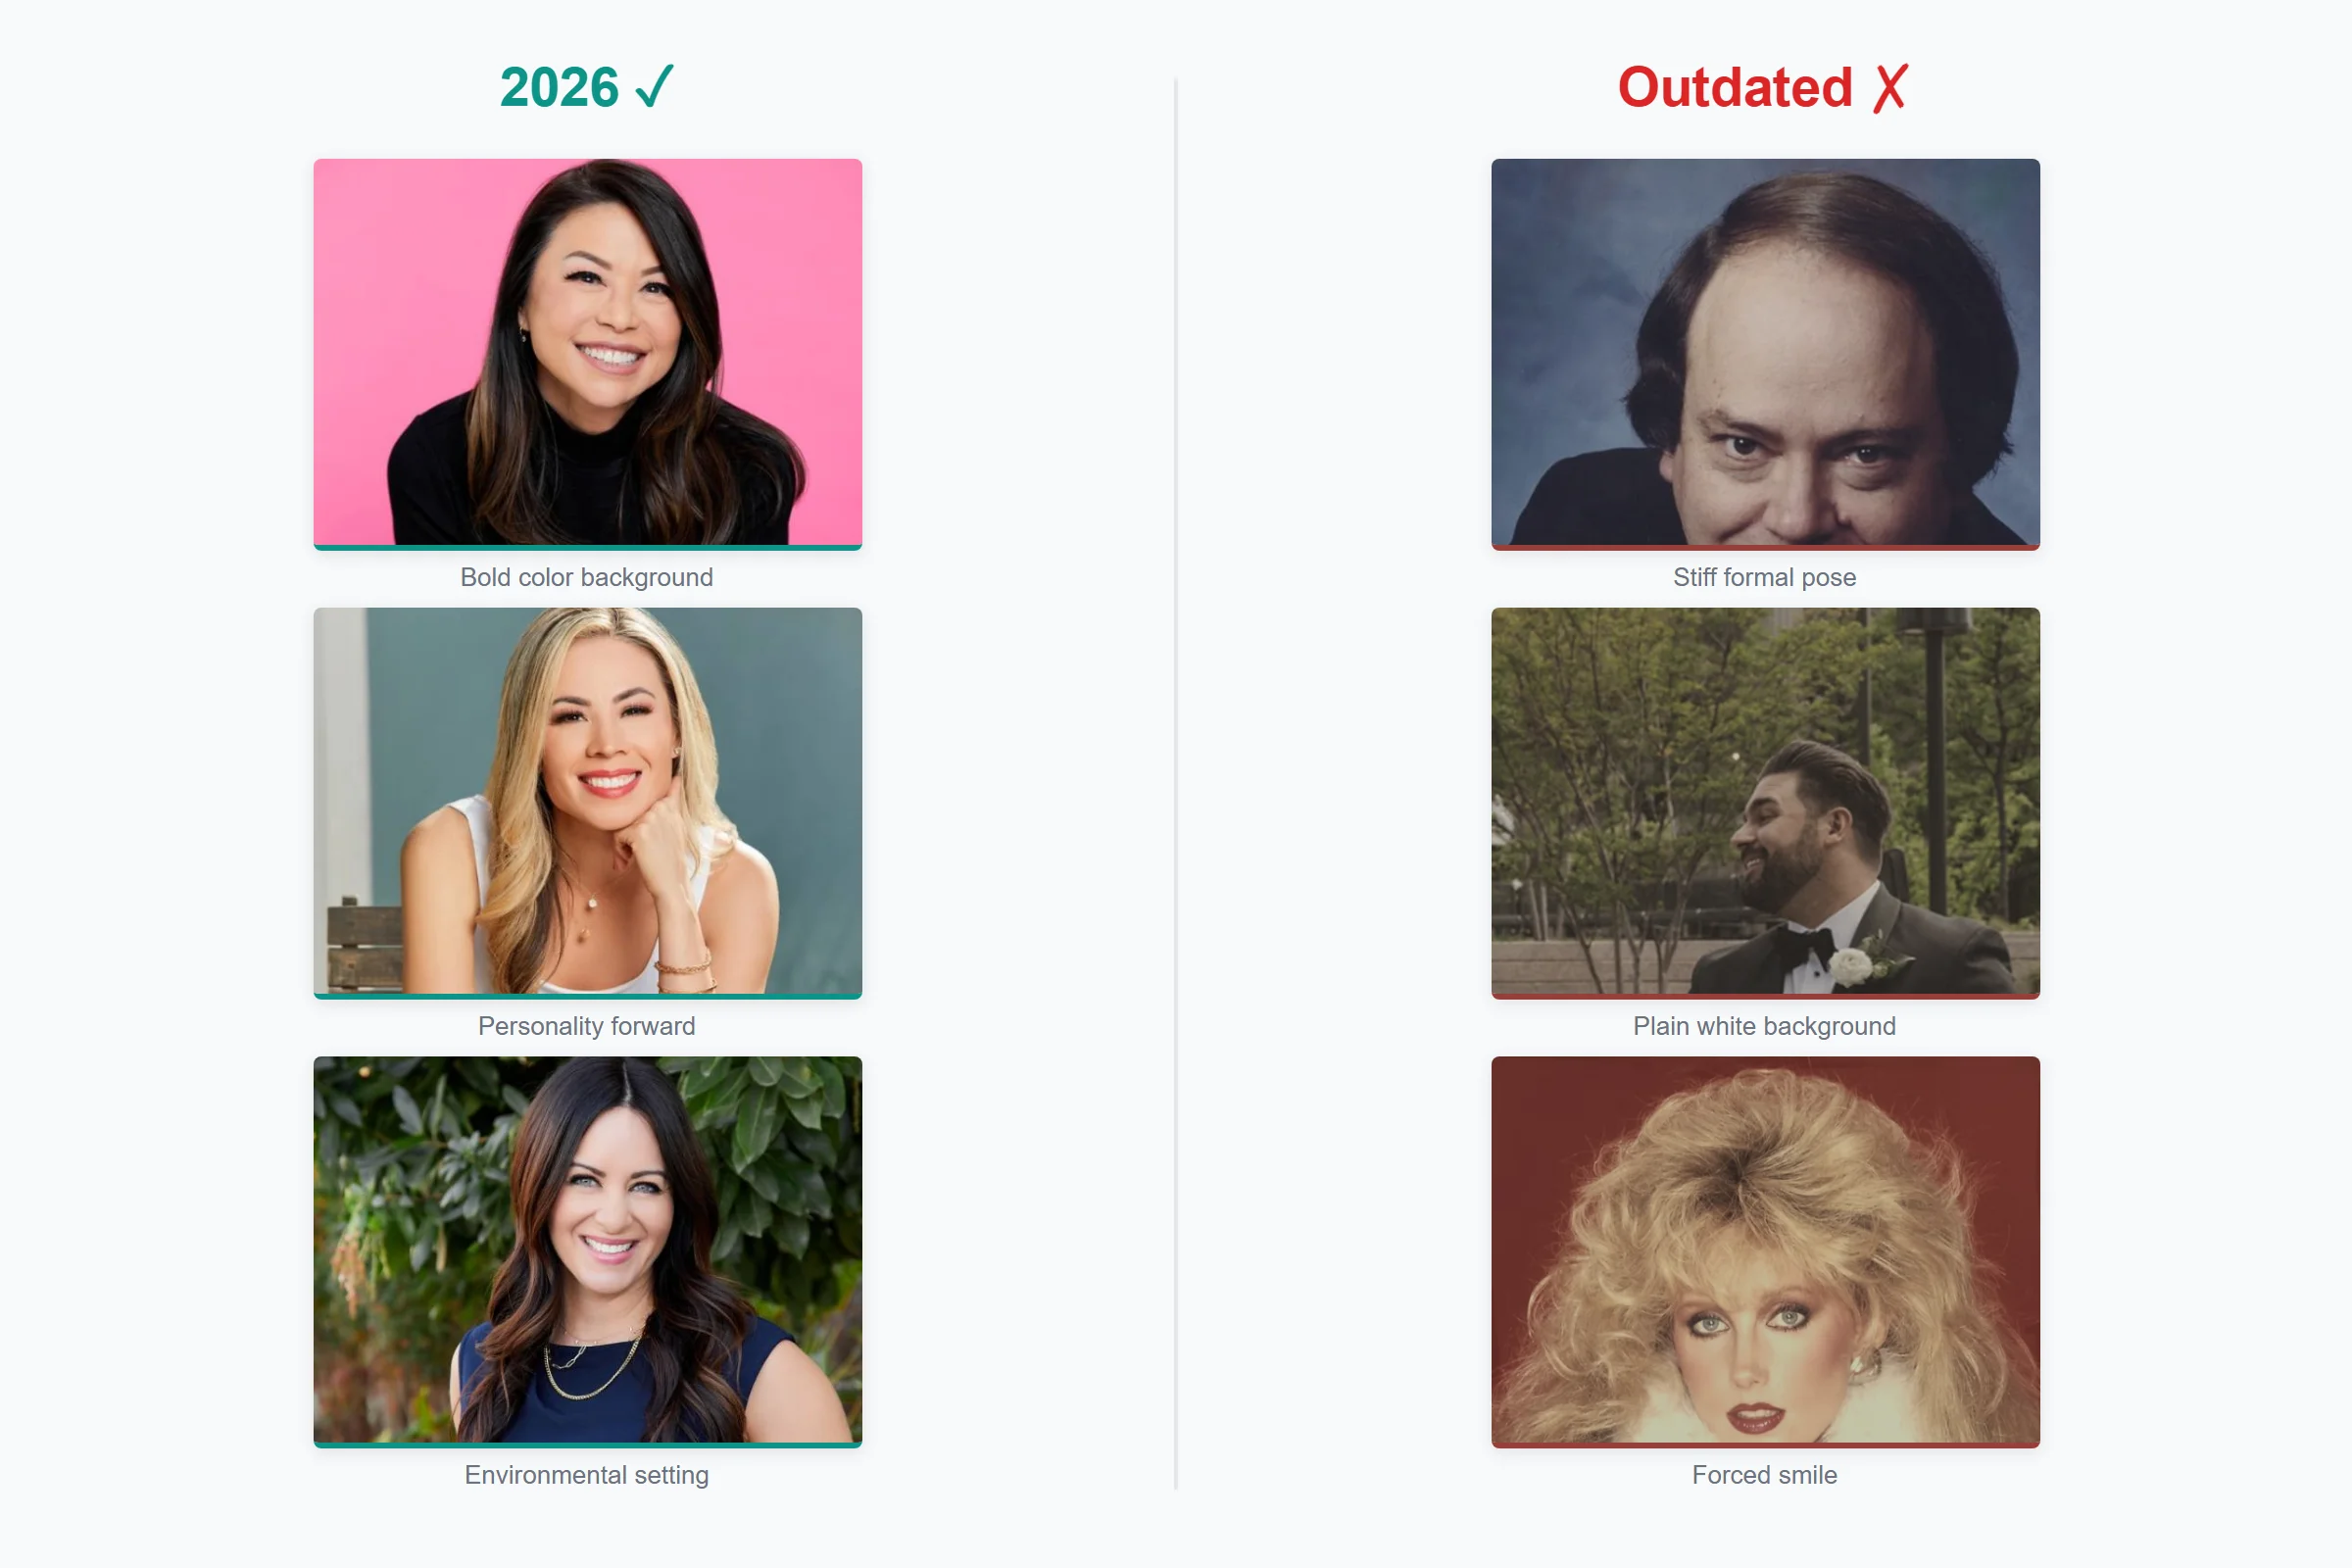
Mistake 3: The Outdated Headshot
Using a photo from 2017 because “I haven’t changed that much.” You have. And even if you genuinely haven’t, the photo quality, wardrobe, and styling all date it. As one prospect told us: “It’s blurry. It’s like 15 years old and you look kind of scary.” A headshot should be updated every 2-3 years at minimum, or whenever your appearance changes significantly (haircut, glasses, weight change).
Mistake 4: The Wedding Crop
Cropping your spouse out of a wedding photo and using it as a professional headshot. This happens more than you’d think — “I get a dollar for every wedding photo that was like 15 years old with the wife or the husband cut out,” one HR director told us. The tuxedo or ball gown is the giveaway. The awkward crop is the second one.
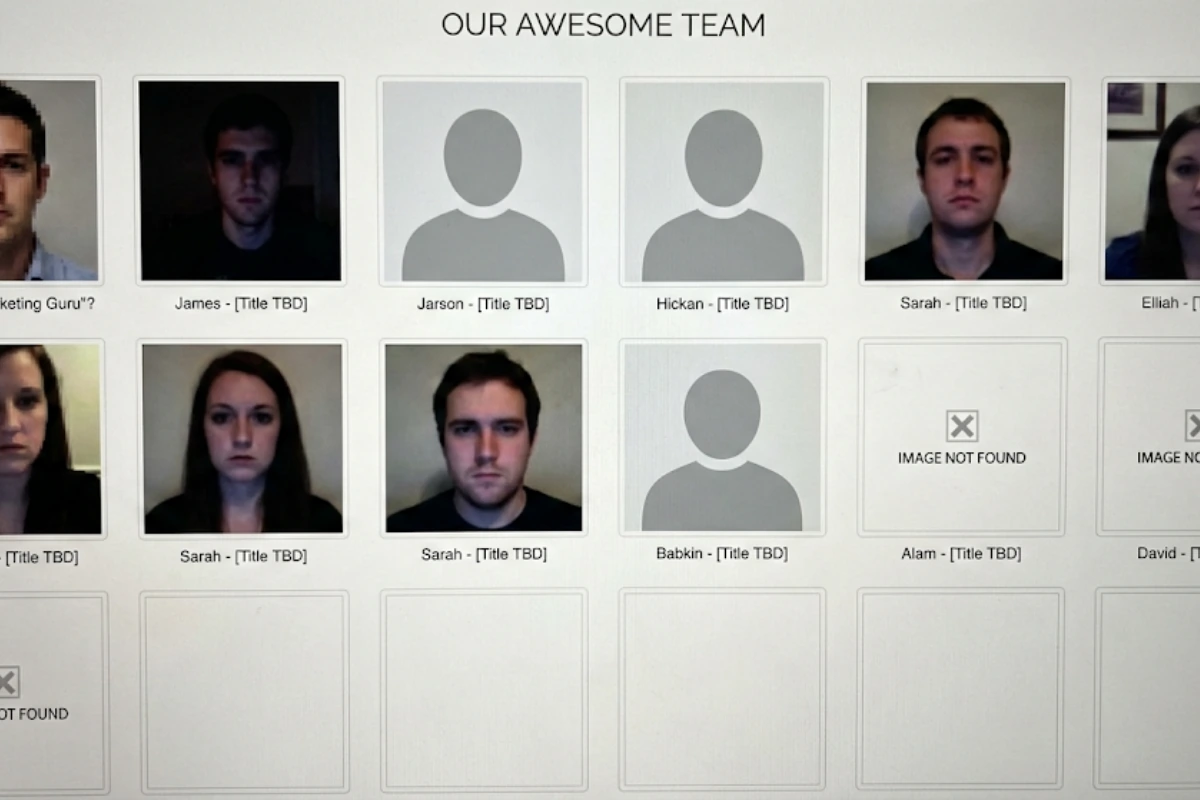
Mistake 5: Inconsistent Team Photos
This one’s for the managers. If your team page has one person on a white background, another in a park, another in what appears to be a hotel bathroom, and three missing entirely — it undermines every claim of professionalism your website makes. Research shows 47% of brand perception is based on visuals, and an inconsistent team page is one of the most visible failures.
How to Prepare for a Professional Headshot Session
Whether you’re doing DIY or booking with a photographer (in-person or virtual), this timeline gets you ready:
One Week Before
- Get your haircut or trim. Not the day before — it needs a few days to settle.
- Start hydrating your skin (water, moisturizer). Camera and professional retouching amplify dry skin.
- Pick 2-3 outfit options. Try them on and photograph them in similar lighting to see how they look on camera versus in the mirror (they’re different).
- If you wear glasses, consider getting anti-reflective lenses or plan to do one set without glasses. Glare is the #1 glasses problem in headshots.
Day Before
- Iron or steam your outfit. Hang it, don’t fold it.
- Skip anything that changes your face temporarily: aggressive facials, waxing, new skincare products that might cause irritation.
- Get decent sleep. Dark under-eye circles are fixable in editing, but it’s easier to just not have them.
Day Of
- Grooming: standard routine, nothing new. This is not the day to try a bold new hairstyle.
- Makeup (if applicable): slightly heavier than normal, but natural-looking. Cameras wash out color, so what feels like “a bit much” in person often looks perfect on screen. Avoid shimmer and glitter — they catch light and create distracting spots. Matte everything.
- Eat before the session. Low blood sugar = flat expression = bad photos.
- Bring a lint roller. Pet hair shows up on camera in places you’d never expect.
- If shooting at home: clean the background area, close the blinds on windows behind you (to prevent backlighting), and turn off overhead lights.
For a more detailed wardrobe guide by industry, check out our post on what to wear for professional headshots.
When DIY Isn’t Enough: Signs You Need Professional Help
DIY is a valid starting point. But there are clear signals that you’ve hit the ceiling:
- You’ve taken 50+ photos and still aren’t happy. That’s not pickiness — it’s the direction gap. You need someone who can see what you can’t see about yourself.
- You’re managing headshots for a team. Getting consistent backgrounds, lighting, framing, and style across 10+ people doing DIY is nearly impossible. You’ll end up with a team page that looks like a random collage.
- The headshot is client-facing or patient-facing. Healthcare providers, attorneys, financial advisors, and real estate agents are judged directly on their headshot quality. A DIY photo in these contexts can cost you business. As one McKinsey partner put it, clients research your team before meetings — 80% of the time.
- You need it fast. DIY means setup time, shooting time, editing time, and re-shooting time when you don’t like the result. A virtual session takes 10 minutes with 24-hour delivery.
- You genuinely hate being photographed. If the thought of taking your own headshot triggers dread, a live photographer won’t just take a better photo — they’ll make the experience bearable. Sometimes even enjoyable.
Ready to skip the DIY struggle? Capturely’s live photographers handle everything — lighting, posing, expression — in a 10-minute virtual session. 24-hour delivery. 98+ backgrounds. 765+ five-star reviews. Book your session →
Frequently Asked Questions
Can I take my own professional headshots at home?
Yes, with effort and the right setup. You need natural window light (not overhead lights), a clean background, a phone propped at eye level using the rear camera, and patience to take 20-30+ shots to find one where lighting, expression, and posture all align. The tips in this guide will get you a serviceable headshot. But research consistently shows that self-directed photos score lower on perceived competence and likability than photographer-directed ones — because you can’t see your own face while the photo is being taken.
How much do professional headshots cost?
It depends on the method. DIY is free (but costs your time). Virtual headshots with a live photographer run $45-$79 per person at Capturely, with team volume discounts up to 45%. In-person studios charge $150-$450+ per session in major metros, plus travel time. AI headshot generators cost $29-$59 but produce digitally fabricated images, not real photographs. For a full breakdown, see our professional headshot cost guide.
How should I pose for a professional headshot?
Turn your body 30-45 degrees from the camera and rotate your head back to face the lens (the three-quarter turn). Push your chin slightly forward and down to define your jawline. Drop your shoulders consciously — they rise under stress. Lean very slightly forward for engagement. Look directly into the camera lens, not at the screen. These five adjustments will improve any headshot dramatically.
Should I smile in my professional headshot?
Usually, yes — but authentically. A genuine smile (Duchenne smile) engages muscles around both the mouth and eyes, conveying warmth and competence simultaneously. A forced smile — mouth up, eyes flat — reads as insincere. If you can’t produce a natural smile on command, use the memory technique (recall something genuinely funny) or the exhale technique (smile at the bottom of a deep breath when your face naturally relaxes). For legal, executive, and authority-first contexts, a confident “squinch” with slightly parted lips can work better than a full smile.
What makes a good professional headshot?
Five things: good lighting (soft, directional natural light), a clean background that doesn’t compete with your face, an expression that conveys confidence and approachability, sharp focus on your eyes, and appropriate framing (mid-chest up, eyes in the upper third). Beyond technical quality, the headshot should look like you on a good day — current, well-groomed, and authentically you. It should match what people see on a video call.
Can a selfie be a professional headshot?
Technically, no. Selfie cameras use a wide-angle lens that distorts facial proportions — making your nose appear larger and your face wider than it actually is. Even with perfect lighting and expression, the distortion is visible to trained eyes. The rear camera on your phone (36-48 megapixels with a more natural focal length) produces dramatically better results. If you must use a phone, always use the rear camera with a timer or have someone else hold it.
How often should I update my professional headshot?
Every 2-3 years, or whenever your appearance changes noticeably (new hairstyle, glasses, significant weight change). An outdated headshot creates a trust gap — when someone sees your photo and then meets you on Zoom or in person, the disconnect undermines credibility. If colleagues wouldn’t immediately recognize you from your current headshot, it’s time for a new one.
What is a virtual headshot session?
A virtual headshot session connects you with a professional photographer through a video link on your phone — like a FaceTime call. The photographer directs your session in real time, coaching your posture, expression, and lighting while you use your phone’s rear camera to capture the images. You get studio-quality headshots without leaving your home or office. Capturely pioneered this model and has delivered over 100,000 headshots this way for companies including Google, Netflix, Amazon, Microsoft, McKinsey, and UnitedHealth Group. Sessions take about 10 minutes, and professionally retouched photos are delivered within 24 hours.
The Bottom Line
Taking a professional headshot isn’t complicated. Good light, clean background, proper posing, authentic expression. Follow the steps in this guide and you can absolutely get a decent result on your own.
But decent might not be enough.
Your headshot appears in more places than any other single piece of your professional identity — LinkedIn, company website, email signature, Slack, conference badges, proposals. Each one is a 100-millisecond trust judgment. Each one shapes whether someone decides to reply, meet, or hire before they’ve heard a word from you.
If you’re comfortable behind a camera and have good light, DIY works. If you’re managing a team and need consistency across 50 people, it doesn’t. And if you’re one of the 87% who’d rather do almost anything than pose for a photo — having a professional photographer directing you through it, live, from your phone, in 10 minutes — isn’t a luxury. It’s the difference between a headshot that builds trust and one that collects dust in a folder you hope nobody opens.
You know which one you need. The only question is whether you’ll keep putting it off.
For a complete overview of professional headshot types, costs, and options, read our professional headshots guide. For LinkedIn-specific guidance, see our best LinkedIn headshot guide.