Headshots with glasses look bad when light reflects off the lenses and creates white hotspots that obscure your eyes. The fix involves angling the light source above eye level, tilting your chin down slightly, and using soft or natural light instead of direct flash. Anti-reflective coating on your lenses eliminates up to 99% of surface reflections before the session even starts.
Last updated: March 2026

This matters to a lot of people. About 64% of American adults wear prescription eyeglasses — roughly 166.5 million people (The Vision Council, 2024). If you include contacts and reading glasses, that number jumps to 75%. Yet most headshot advice is written as if everyone has 20/20 vision and bare eyes.
At Capturely, we photograph thousands of professionals every month. A significant chunk of them wear glasses. The good news: getting a great headshot with glasses is not hard once you understand why glare happens and what to do about it. Here are the techniques that actually work — from both the photographer’s side and yours.
Why Do Headshots With Glasses Get Ruined by Glare?
Glare in glasses headshots comes down to one physics principle: the angle of incidence equals the angle of reflection. When light hits the flat surface of a glasses lens, it bounces off at a mirror-image angle. If that reflected beam lands in the camera lens, you get a bright white hotspot covering part of your eye.

The biggest culprit is direct flash — a camera-mounted or on-camera flash firing straight at your face at lens height. That is the exact angle guaranteed to bounce right back into the camera. Studio strobes positioned at eye level create the same problem. According to industry data from 36Pix, about 65% of glasses-wearing students have noticeable glare in traditional on-site school photos that use flash (36Pix, 2024). The same physics apply to corporate headshot sessions.
Three things determine whether you get glare:
- The position and angle of the light source
- The position and angle of your head (and glasses)
- The position and angle of the camera
As portrait educator Joe Edelman, Cr.Photog. with the Professional Photographers of America, explains: you only need to change one of those three variables to eliminate the reflection. The trick is knowing which one to adjust.
7 Tips for Glare-Free Professional Headshots With Glasses
These techniques work whether you are in a studio, shooting at home, or doing a virtual headshot session. Some are preparation steps you handle before the shoot. Others are adjustments your photographer makes in real time.
1. Get Anti-Reflective Coating on Your Lenses
This is the single best thing you can do before any headshot session. Modern anti-reflective (AR) coatings allow up to 99.5% of light to pass through your lenses instead of bouncing off them (Edmund Optics, 2024). Without AR coating, each lens surface loses 4-5% of light to reflection, totaling 8-10% across both surfaces. AR coatings reduce total reflectance to less than 0.5%.
Warby Parker includes anti-reflective coating as standard on all lenses now. If your glasses do not have it, most opticians can apply it to existing lenses for $50-$150. It is not just useful for photos — it also helps with video calls, nighttime driving, and reducing eye strain from screens.
About 40% of online glasses purchases already include AR or blue-light coating options (WiFi Talents, 2025). If you are ordering new glasses anyway, add the coating. Your headshot photographer will thank you.
2. Tilt Your Chin Down Slightly
A slight chin-down adjustment — maybe 10-15 degrees — changes the angle of your glasses lenses relative to the light and camera. This causes reflections to bounce downward toward the floor instead of straight into the lens.
Important: tilt your head, not your glasses. Do not push your glasses down your nose. Multiple photographers warn that sliding glasses down changes the angle so the top of the frames encroaches on your upper eye area, making your eyes appear smaller and the look unnatural. Keep the glasses where they sit naturally and adjust your head position instead.
3. Angle Your Head 10-20 Degrees Off Center
A straight-on face gives the light the widest, flattest surface to reflect off. Turning your head slightly to one side — just 10-20 degrees — changes the geometry enough that reflections slide off to the side rather than straight back at the camera.
This is also just better headshot posing in general. A slight angle adds dimension and avoids the passport-photo flatness that makes corporate headshots look stiff. For more posing techniques, see our complete headshot poses guide.
4. Use Soft, Diffused Lighting (Not Direct Flash)
Hard light from a direct flash or bare strobe creates sharp, crisp reflections on glasses — the kind that white out entire sections of the lens. Soft light from a large light source (a big softbox, a window, an overcast sky) wraps around the face and produces only faint, diffused reflections that are often invisible in the final image.
According to Mike Hamilton of MHamiltonVisuals, a headshot photographer who regularly works with glasses-wearing clients, the key is getting the light source above eye level and off to the side. Butterfly lighting (light directly in front, slightly above) and loop lighting (light 30-45 degrees to the side, slightly above) both work well. Rembrandt lighting is the most problematic pattern for glasses because the steep angle that creates the signature nose-cheek triangle easily introduces glare.
If you are taking your own headshots, position yourself facing a large window with indirect light. North-facing windows produce consistently soft, even illumination throughout the day. That single adjustment eliminates most glare problems before you even pick up the camera.
5. Clean Your Lenses Obsessively
This sounds obvious. It is not. High-resolution cameras (and phone cameras at 36-48 megapixels) capture every fingerprint, smudge, water spot, and dust particle on your lenses. What looks clean to your eye becomes a distracting mess in a close-up headshot.
Use a proper microfiber cloth and lens cleaning solution — not your shirt, not a tissue, not a paper towel. Those materials can scratch AR coatings. If your glasses are particularly grimy, rinse them under lukewarm water first to dislodge grit before wiping.
Bring the microfiber cloth to the session. Every time you adjust your glasses during posing, you are depositing new fingerprints. Clean between setups. Photographers describe smudged lenses as “a royal pain” to fix in post-processing — it takes 15-30 minutes per image to cleanly retouch what a 10-second wipe would have prevented.
6. Avoid Transition Lenses on Shoot Day
Transition lenses (photochromic lenses) that darken in sunlight can cause problems even indoors. Some modern versions respond to high-energy visible light, not just UV, which means they can partially tint under studio lights or near bright windows. The result is lenses that look unevenly darkened — sunglass-like in a way that obscures your eyes.
If you own a non-transition backup pair, wear those. If transitions are your only option, let your photographer know in advance so they can reduce light intensity and monitor for tinting during the session.
7. Let Your Photographer Adjust in Real Time
The most reliable glare fix is a photographer who can see the problem and direct you to fix it on the spot. “Turn your head slightly left.” “Drop your chin half an inch.” “Step one foot to your right.” Each micro-adjustment changes the reflection angle, and an experienced photographer spots glare in real time.
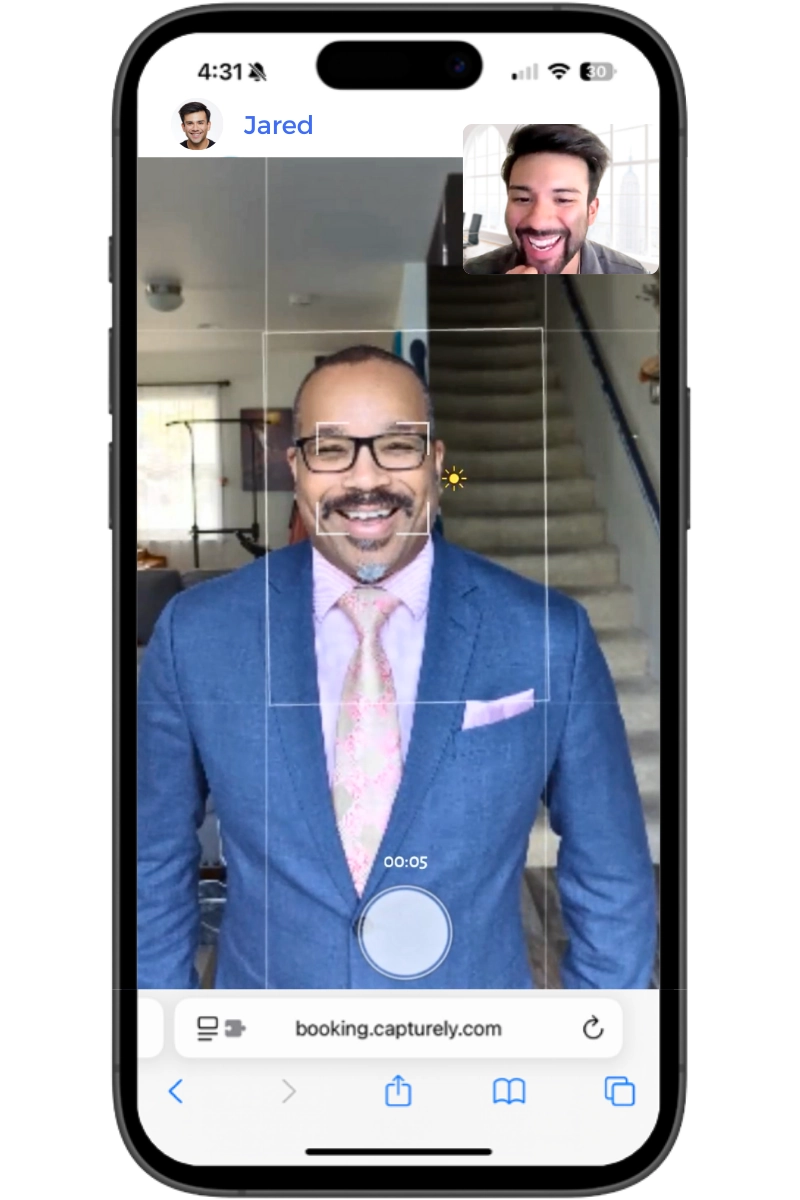
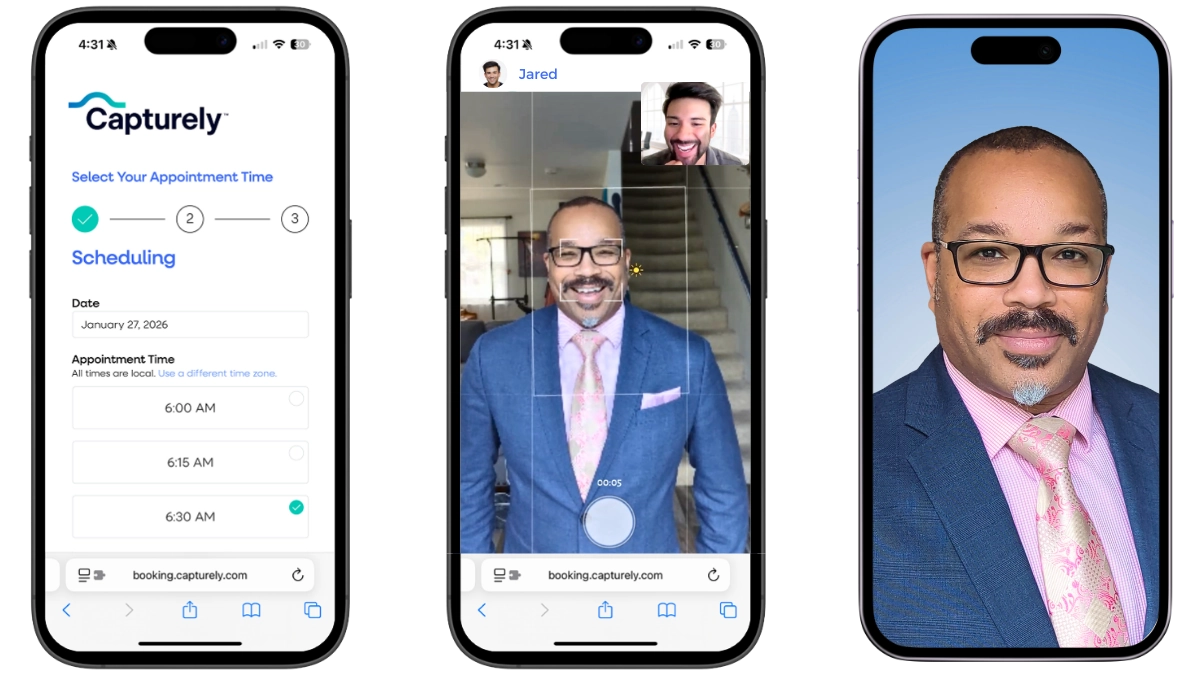
This is actually where virtual headshot sessions have a major advantage. Because the photographer sees your live phone feed, any glare is visible immediately — no test shots, no chimping through photos afterward, no guessing. The direction happens in real time, and both you and the photographer can see the glare disappear as you make each adjustment.
Your photographer catches glare before the shutter clicks. Capturely’s live-directed virtual sessions let your photographer see your glasses in real time and guide you through micro-adjustments until the glare vanishes. 10-minute sessions, 3 edited images, 24-hour delivery. Book your session →
Should You Take Your Glasses Off for a Headshot?
Short answer: if you wear glasses every day, keep them on. They are part of how people recognize you. Removing them for a headshot creates a disconnect — colleagues, clients, and recruiters who meet you in person will see a different face than the one in your photo.

There is also a perception benefit to keeping them. Research published in the Swiss Journal of Psychology found that rimless glasses increased perceived trustworthiness without decreasing perceived attractiveness (Leder, Forster & Gerger, 2011). A separate survey by the British College of Optometrists found that 43% of people believe glasses make someone look more intelligent, and 36% believe they make someone look more professional (College of Optometrists, 2011).
In industries where trust and credibility matter — financial services, healthcare, law, consulting — glasses actually help. They signal attentiveness and analytical thinking. Removing them to avoid a solvable glare problem means losing a genuine perception advantage.
The practical advice from Mike Hamilton, a headshot photographer who works extensively with corporate clients: “If you wear your glasses most of the time, you should probably wear them in your headshot — people should recognize you.” His recommendation is to shoot both with and without glasses so you have options. Use the glasses version as your primary LinkedIn and website headshot if you wear them daily.
For people with strong prescriptions, there is a comfort factor too. Removing glasses means you cannot see the photographer clearly, which creates unnatural expressions and visible discomfort. Your glasses are a medical device that helps you function. Keep them on.
When Removing Glasses Makes Sense
A few exceptions:
- You only wear glasses for reading or close-up work and do not wear them in professional settings. Your headshot should match how people encounter you.
- Your frames are heavily scratched, damaged, or outdated and you cannot replace them before the session. Damaged frames are more distracting than no frames.
- You are an actor and your agent requests a glasses-free look for casting versatility. Even then, most agents want both options on file.
What Glasses Frames Work Best for Headshots?
Not all frames photograph the same way. Your frame choice affects shadow patterns, reflection risk, and how attention flows across your face.

| Frame Type | Pros for Headshots | Cons for Headshots | Best For |
|---|---|---|---|
| Thin/rimless | Subtle, lets eyes dominate, increases trustworthiness | May look invisible, less distinctive | Corporate, finance, healthcare, law |
| Semi-rimless | Balanced, professional, moderate shadow | Top rim can cast a line shadow across eye | Most professional contexts |
| Thick acetate | Strong style statement, confident look | Casts heavier shadows, more surface area for glare | Creative fields, tech, startups |
| Metal frames | Clean, classic, lightweight feel | Polished metal creates secondary reflections on temples | Traditional corporate |
| Clear/transparent | Modern, does not obscure face | Can look invisible in certain lighting | Creative industries, personal branding |
Rectangular or structured frames suggest decisiveness and professionalism — they work well in headshots for men in business settings. Rounder, softer frames read as creative and approachable. Neither is wrong; it depends on the impression you want to make.
The ideal frames for a headshot are the ones you actually wear. Do not buy new frames specifically for the photo session unless you plan to keep wearing them. A headshot with unfamiliar frames looks just as disconnected as one without glasses at all.
Why Virtual Headshots Solve the Glasses Problem
Here is something no other article about headshots with glasses mentions: virtual headshot sessions structurally eliminate most of the reasons glasses cause problems in the first place.
No studio strobes means no strobe reflection. The number one cause of glasses glare in professional headshots is studio flash — an intense burst of concentrated light that creates a sharply defined white rectangle on each lens. In a virtual session using natural light at home, there is no strobe. The light source is ambient: a window, diffused daylight, an overcast sky. These are inherently soft, broad light sources that wrap around the face rather than blasting a single point of reflection.
The light source is enormous. A studio softbox is typically 2-4 feet across. A window is 3-6 feet across. The larger the light source relative to the subject, the softer and more diffused any reflection becomes. Instead of a crisp white rectangle reflected in each lens, natural window light produces a faint, even glow that is often invisible in the final image.
Real-time direction with live preview. With a phone camera, both you and your photographer see the live image on screen. Glare is visible immediately. Your photographer says “turn your head slightly left” and watches the glare disappear in real time. No test shots. No guessing. No reviewing 30 photos after the session to find the three without glare.
Your rear camera is the right tool. Most front-facing phone cameras use a wide-angle lens (24-28mm equivalent) that distorts glasses frames and makes them appear oversized. Capturely sessions use the phone’s rear camera (36-48 megapixels, 50-77mm equivalent telephoto), which produces flattering compression comparable to a professional 85mm portrait lens. Your glasses look like they actually look on your face.
Home environment means controllable reflections. Your glasses do not only reflect lights — they reflect windows, computer screens, white walls, and even the photographer’s shirt. At home, your photographer can direct you to position yourself with a dark room behind the camera, so there is nothing bright to reflect in your lenses. In a home headshot session, you control the environment.
Kristina Taylor at INFI described seeing Capturely’s before-and-after editing examples, including glasses glare removal: “You guys are freaking good. Well, I’m very excited that my predecessor found you… this is fantastic. Absolutely fantastic.”
Glasses? Not a problem. Capturely’s virtual sessions use natural light and real-time photographer direction — the two things that eliminate glasses glare. 10-minute session from anywhere, 3 edited images in 24 hours, 98+ backgrounds, happiness guarantee. Teams save up to 45%. Get an instant quote →
What If You Still Get Glare? Post-Processing Options
Even with perfect technique, a stray reflection sometimes sneaks through. Professional retouching can handle it — but it is not a replacement for getting the shot right in camera.

Professional retouchers use a technique called Frequency Separation to remove glare without destroying the underlying skin texture and eye detail. The process separates color/tone (low frequency) from texture (high frequency), suppresses the bright highlight on the color layer, then rebuilds hidden detail on the texture layer. Done well, it is invisible. Done poorly, it creates a flat, plastic look around the eyes.
AI-powered tools like Adobe’s Generative Fill and specialty apps like Evoto can auto-detect and remove glare, but professional retouching studios report that AI “fails on complex glare patterns” and manual techniques remain more reliable for commercial headshots where skin texture must be perfect (ImageWork India, 2025).
The honest take: post-processing glare removal takes 15-30 minutes per image and does not always produce perfect results. If you have the option to fix glare during the session — with a slight head tilt, a lighting adjustment, or a step to the left — take it. Prevention beats correction every time.
Capturely’s 24-hour delivery includes professional retouching on all three edited images. If a trace of glare slips through despite the real-time direction, the editing team handles it.
Common Mistakes With Glasses in Headshots
These are the errors we see most often — from both photographers and subjects:

- Using on-camera flash. A flash mounted on or next to the camera fires directly at your face at lens height — the exact angle that creates maximum reflection on both lenses. Move any light source off-camera and above eye level.
- Pushing glasses down the nose. Some photographers suggest this to change the reflection angle. It backfires. The top of the frames drops into your eye area, making your eyes look smaller and the pose unnatural.
- Ignoring transition lenses. Photochromic lenses can tint unpredictably under studio lights or near bright windows. Bring a non-transition backup if you own one.
- Planning to “fix it in post.” Glare removal in post-processing is time-consuming and imperfect. Getting it right during the session is faster, cheaper, and produces better results.
- Forgetting what is behind the camera. Your glasses reflect everything in front of them — not just lights. Bright walls, windows, computer screens, and even a photographer’s white shirt can show up as reflections. Darken the area behind the camera.
- Dirty lenses. Every fingerprint and smudge becomes visible in a high-resolution close-up. Clean before the session and between setups.
Frequently Asked Questions
Should I wear glasses in my professional headshot?
If you wear glasses every day, yes. Your headshot should match how people encounter you in professional settings. Removing glasses creates a recognition disconnect — colleagues and clients see a different face than your photo. Research shows glasses increase perceived intelligence by 43% and professionalism by 36% (College of Optometrists, 2011). Shoot both with and without for options, but use the glasses version as your primary photo.
How do I avoid glare on glasses in headshot photos?
Position the light source above eye level and off to one side so reflections bounce downward instead of into the camera. Tilt your chin down slightly, turn your head 10-20 degrees off center, and use soft or natural light rather than direct flash. Anti-reflective coating on your lenses reduces surface reflections from 8-10% to under 0.5%. Have your photographer check for glare in real time before each shot.
What type of glasses look best in professional headshots?
Frames that match your daily wear and complement your face shape. Thin or rimless frames are best for corporate settings — they keep attention on your eyes and increase perceived trustworthiness (Leder et al., 2011). Thicker acetate frames work well for creative fields and startups. Avoid heavily scratched lenses, shiny polished metal frames that create secondary reflections, and transition lenses that can darken unpredictably.
Does anti-reflective coating help with headshot glare?
Significantly. AR coatings allow 99.5% of light to pass through the lens instead of reflecting off it, reducing total reflectance from 8-10% to less than 0.5% (Edmund Optics, 2024). Warby Parker now includes AR coating as standard on all lenses. Most opticians can apply it to existing glasses for $50-$150. It is the single most effective preparation step for any headshot session.
Can virtual headshots work for people who wear glasses?
Virtual headshots are actually better for glasses wearers than traditional studio sessions. Natural window light produces soft, diffused illumination that creates minimal lens reflections — unlike studio strobes that blast concentrated light directly at your face. The photographer sees your live phone feed and directs micro-adjustments in real time. Capturely uses the phone’s rear camera (36-48 megapixels) for proper focal length and includes professional retouching in 24-hour delivery.
How much do professional headshots cost if I wear glasses?
Glasses should not change the price. Virtual headshot sessions like Capturely cost $79 per person for individuals and $45-$79 per person for teams (up to 45% savings at volume). Traditional studio headshots run $200-$500 per session. Some studios charge extra for glasses-specific retouching, but Capturely includes all retouching in the standard price. See our full headshot pricing breakdown for details.
What is the best lighting for headshots with glasses?
Soft, diffused light positioned above eye level and slightly to one side. Loop lighting (30-45 degrees from center, slightly above) is the most reliable pattern for glasses wearers. Natural window light is ideal — the large light source creates gentle reflections that are often invisible in the final image. Avoid Rembrandt lighting (the steep angle introduces glare easily) and never use on-camera flash, which fires directly at lens height and guarantees reflections on both lenses.
765+ reviews at 4.9 stars — glasses wearers included. Capturely’s live-directed sessions, natural light, and professional retouching mean your glasses are never a problem. 10 minutes, 3 edited images, 24-hour delivery. Get started →